Encoder Decoder Architecture
Table Of Contents:
- Milestones In Deep Learning.
- What Is Sequence To Sequence Model?
(1) Milestones In Deep Learning ?
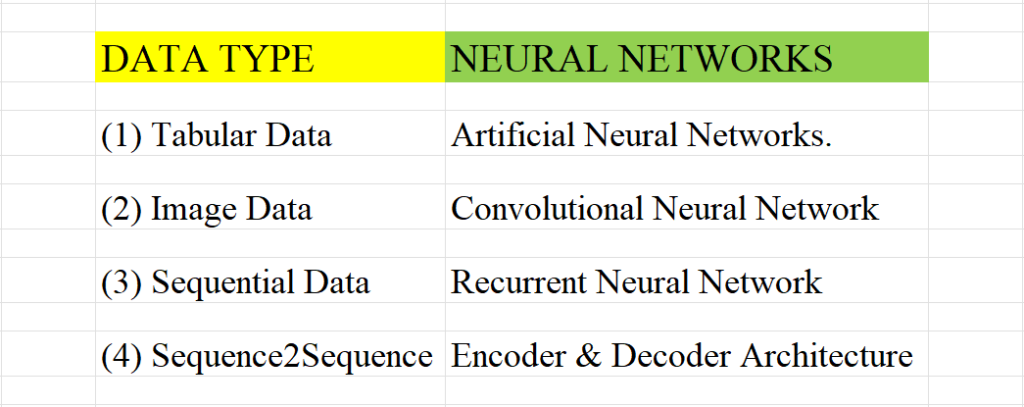
- Milestone-1: In the initial days we have only tabular information that will consist of rows and columns, like Excel, and CSV data sets. Example student dataset, employee dataset, product details etc. This data is called the Cross-Sectional dataset. To process these data we are using “Artificial Neural Networks.”
- Milestone-2: Next comes the Image dataset where the data is represented in 2d vector space. To handle this information we are using “Convolutional Neural Networks.” These networks are specially designed to handle Image datasets.
- Milestone-3: Next the problem comes in handling textual data where the sequence is important. To handle sequential data our computer scientists have designed “Recurrent Neural Networks”.
- Milestone-4: Next comes the problem of Sequential2Sequential data, where input is the sequence of text and output is also a sequence of text. To solve this we have designed Encoder & Decoder architecture.
(2) What Is Sequence To Sequence Model?
- A sequence-to-sequence (seq2seq) model is a type of neural network architecture that is commonly used for tasks that involve mapping one sequence to another, such as machine translation, text summarization, and language generation.
- It takes an input sequence, processes it, and generates an output sequence.
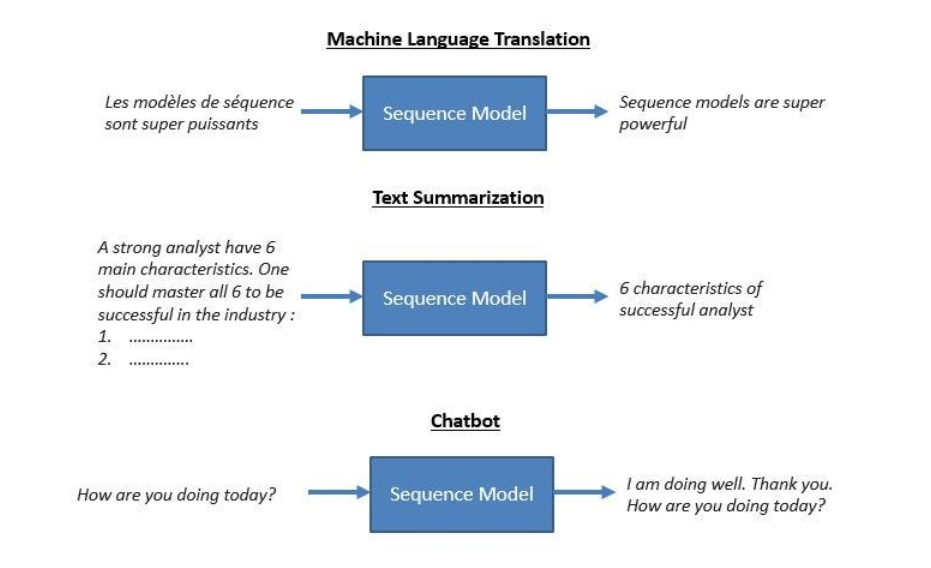
- They are handy for tasks where the input and output are sequences of varying lengths, which traditional neural networks struggle to handle, such as solving complex language problems like machine translation, question answering, creating chatbots, text summarization, etc.

(3) Challenges To Handle Sequence To Sequence Data.
(1) Variable Length Input
- As input is a sentence in some language it will be of variable length.
- Some sentences can be 2 words some can be 200 words.
- Traditional machine learning algorithms will fail to handle variable-length input sizes.
(2) Variable Length Output
- In the case of Sequence2Sequence data, our output will also be a sentence of some different language.
- Traditional ML algorithms will have fixed output nodes that will fail to handle variable length.
(3) Input & Output Can Be Of Different Length.
- In Sequence2Sequence data input can be of English sentence while the output can be of Hindi sentence.
- Here both the input and output can be of different lengths.
- Input can be of 5 words but the output can be 100 words its possible.
Note:
- Luckily we have learned to handle variable length input size by using RNN architecture.
- But we don’t know how to handle variable length output size.
- In this Encoder2Decoder tutorial, we will learn how to handle variable length input and output.
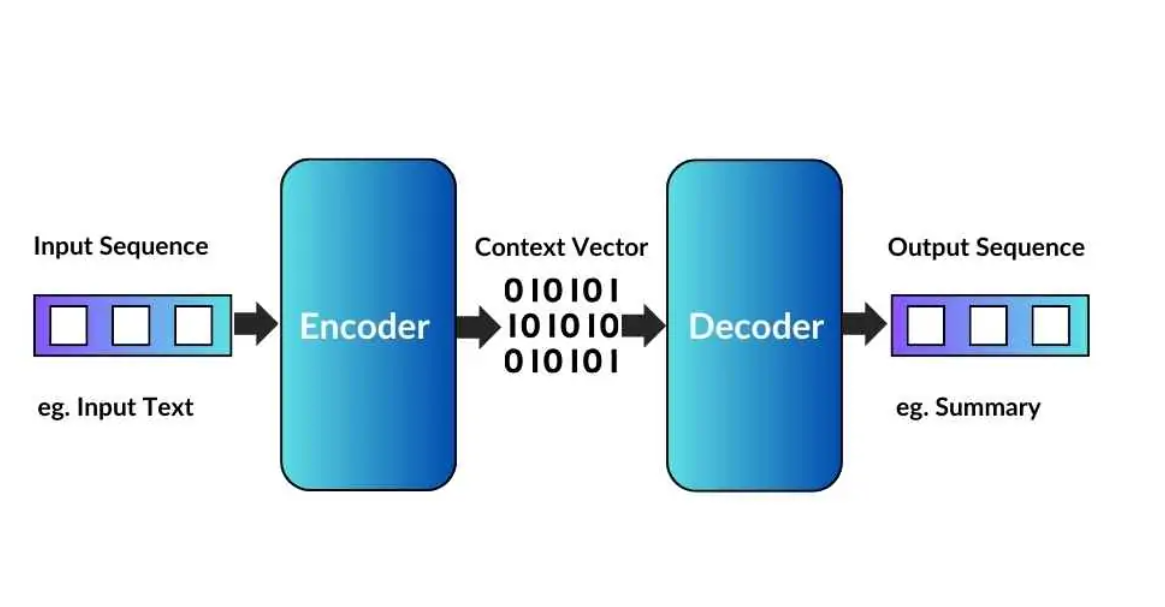
(4) High-level Overview Of Encoder Decoder Architecture.
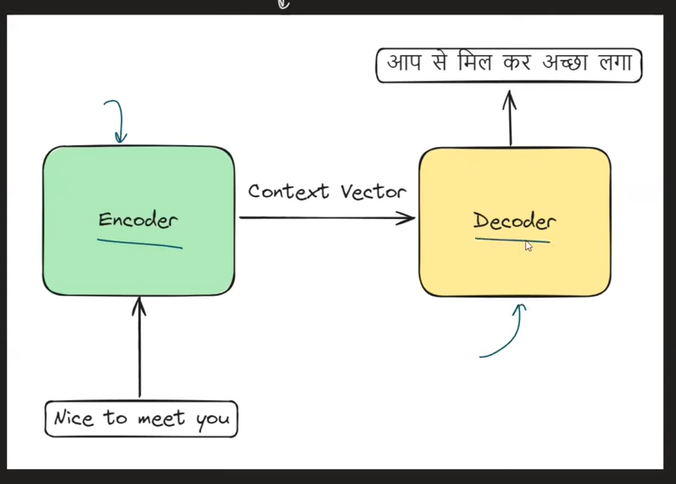
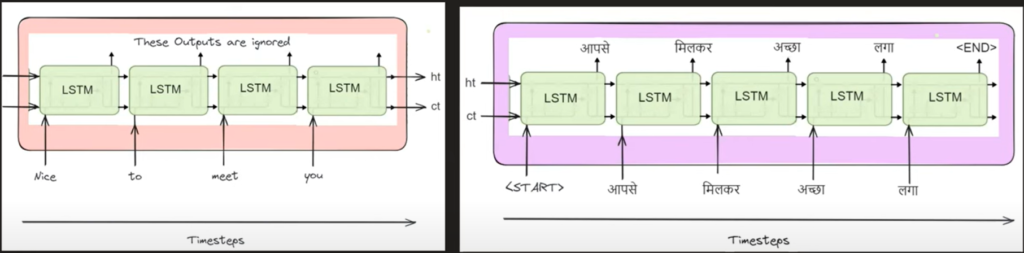
- Step-1: The first step is to prepare the input sentence that you are going to feed. In this case, it is ‘Nice To Meet You’.
- Step-2: Tokonize your input sentence, which means convert the sentence into individual words.
- Step-3: Pass the sentence token by token to the ‘Encoder’ module. Until you finish passing all the tokens from the sentence it will be processed inside the ‘Encoder’ module. It won’t go to the ‘Decoder’ module.
- Step-4: Inside the Encoder module there will be an LSTM neural network present. That will be used to handle variable-length input text.
- Step-5: After you process the entire sentence our ‘Encoder‘ module will produce an ‘n-dimensional’ vector as an output. This vector will represent the summarized context of the sentence.
- Step-6: After we produce the ‘Context Vector’ this will be passed to the ‘Decoder’ module.
- Step-7: The decoder module will process the ‘Context Vector’ and produce the sequence of words as an output.
- Step-8 : In our case, “Nice To Meet You” has been converted to “आपसे मिलकर अच्छा लग| “
(5) What Is Inside Encoder Module?
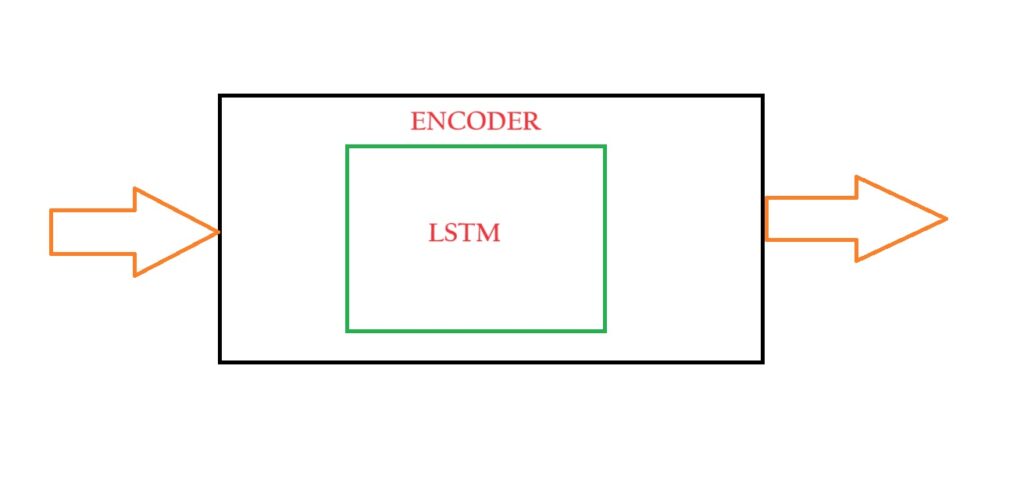
- To handle variable-length sequential information we have ‘LSTM’ networks.
- Hence we will use one ‘LSTM’ network inside the ‘Encoder’ module that will handle the variable length input text.
- Our ‘Encoder’ module will consist of only one LSTM cell inside it which will be rolled out over time for different words.

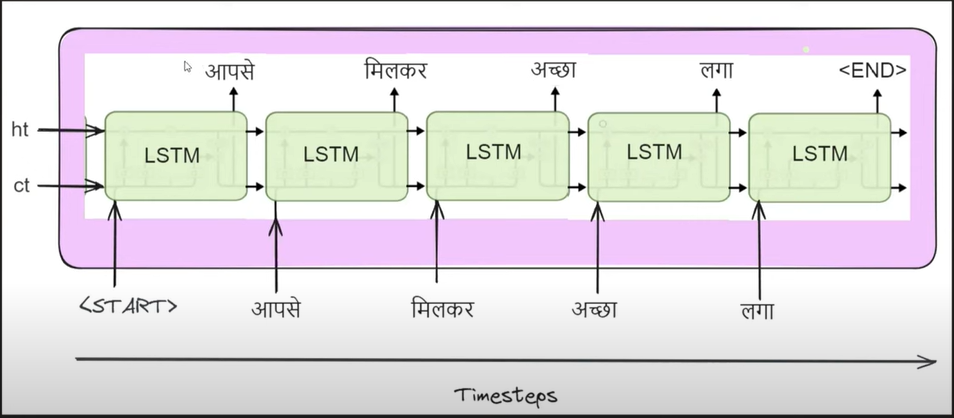
- In the first time step, we will take some random value of (ht, ct) and pass ‘Nice’ as an input to the ‘LSTM’ network.
- The first ‘LSTM’ network will produce some output and intermediate (ht, ct).
- The (ht, ct) of the first timestep will be the input to the second ‘LSTM’ network with also the input of ‘To’.
- Like this, we will pass all of our input words to the ‘LSTM’ network.
- After you finish passing all the words to the single ‘LSTM’ network it will produce two vectors as an output (ht, ct).
- This (ht, ct) will be the summary of the sentence passed to the ‘LSTM’ network.
- The (ht, ct) vector we will call the ‘Context Vector’.
- This ‘Context Vector’ will be passed to the ‘Decoder’ module.
(6) What Is Inside Decoder Module?

- There will also be an ‘LSTM’ network inside the ‘Decoder’ module.
- This ‘LSTM’ network will be able to handle the variable length output text.
- The work of this ‘LSTM’ network is to produce some output at each time step.
- The initial (ht, ct) of the ‘LSTM’ network will be the output from the ‘Encoder’ module.
- Like this, we are passing the summarized context of the input sentence to the decoder module.
- With the ‘Context Vector’ we are also passing a special symbol called the ‘START’.
- By seeing the ‘START’ word our ‘LSTM’ network will start producing the output.
- We are providing the ‘START’ word because after we finish encoding all the words only the ‘Decoder’ module should start working.
- Before that it should not produce any output.
- After you pass the ‘Context Vector’ and the ‘START’ word to the LSTM network will produce ‘आपसे’ as an output.
- In the second time step, you will pass the output of the first time step which is ‘आपसे’ as an input with the internal (ht, ct) vectors.
- In the second time step our LSTM network will also produce some output. In our case, it is ‘मिलकर’.
- We have to do these steps until we get the ‘END’ word as an output. There we will stop the process.
- This means when the ‘Decoder’ sees the ‘END’ as an output our ‘Decoder’ will stop producing the output.
(7) How To Train Encoder & Decoder Architecture.
- Training of Encoder & Decoder happens simultaneously.
- We will train our model by using the example of ‘Machine Translation’.
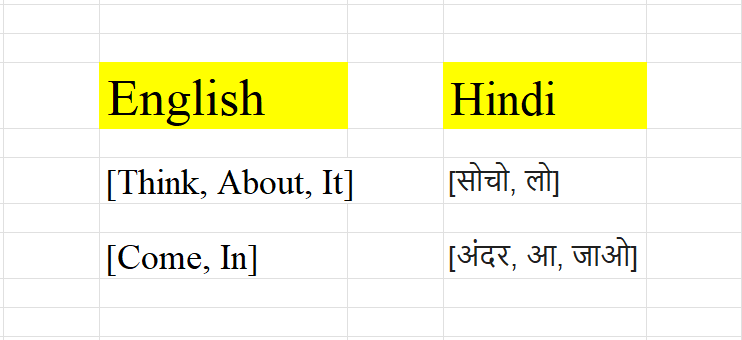
Step-1: Prepare The Training Dataset
- We will use a supervised learning technique to train our model.
- As we are going to take Machine Translation as an example, the first column will be English word and the second column will be the ‘Hindi’ word.

- We will use this dataset to train our model.
- We will use only these two examples to train our model for understanding.

Step-2: Convert The Dataset To Numbers.
- Our Algorithm can’t understand the English and Hindi languages hence we have to convert them into numbers.
- We will use word tokenization technique to do this.
- We will use the One Hot Encoding technique to convert words into numbers.
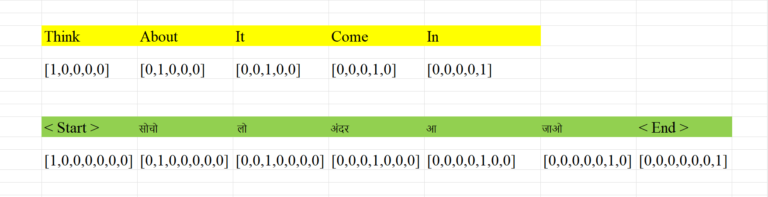
- In English, we have 5 words, of which we have one hot-encoded using a 5-dimensional vector.
- In Hindi also we have 5 words additionally we have <START> & <END> words which also we need to do ‘One Hot Encoding’.
Step-3: Train Both Encoder & Decoder Model.
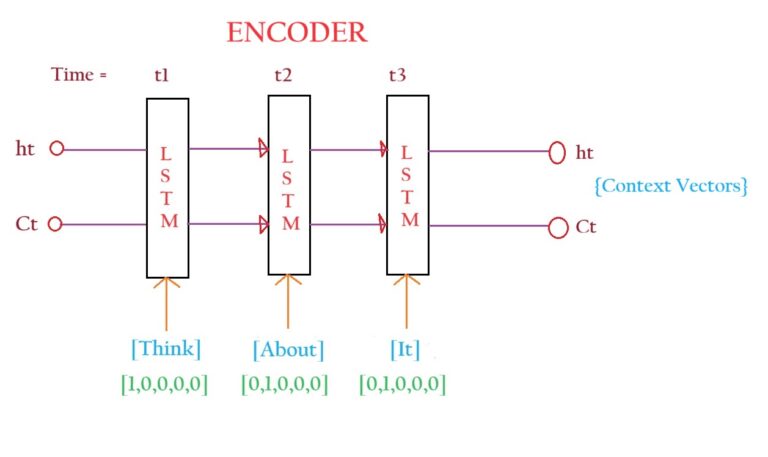
Encoder Layer:
- Note that the training will happen simultaneously for both the encoder and decoder networks.
- Consider the first statement [Think, About, It].
- At time step 1, we will pass the ‘Think’ and the ‘Context Vector’ as input to the LSTM network.
- The output from the first timestep will feed to the LSTM network in the 2nd-time step with the next word ‘About’.
- The output from the third timestep will feed to the LSTM network in the 3rd-time step with the next word ‘It’.
- After you pass all the words from the sentence, it will finally produce the Context Vector.
- This context vector will be passed to the decoder layer. It will try to decode the summarized context and produce the words that are respected in another language.
Decoder Layer:
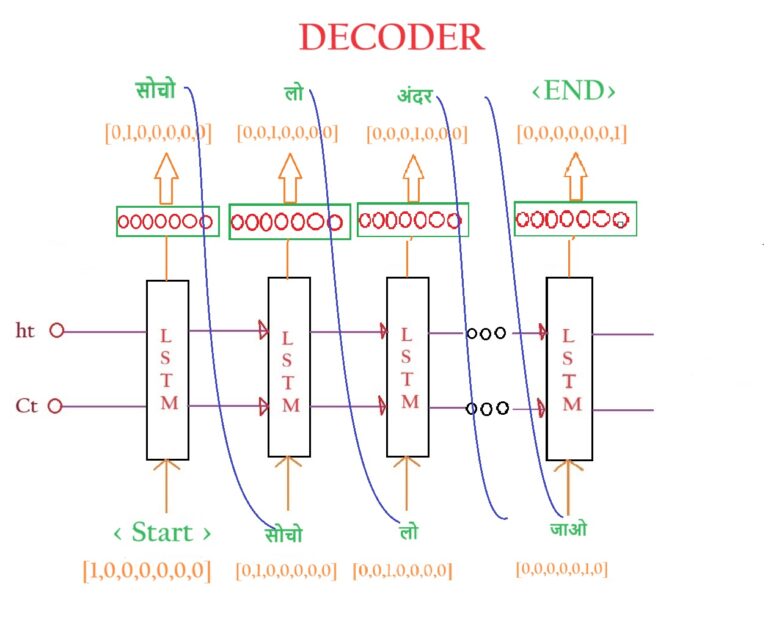
- The Decoder layer consists of one LSTM unit.
- The input to the decoder layer will be the Context Vector from the encoder layer where all the summary of the sentence is hidden.
- Along with that, we pass a special word called <START>, to notify the decoder to start producing output.
- In the first time step, it will take Context Vector and the <START> word as an input.
- Ideally, the output from the first time step will be ‘सोचो’.
- When we are in the initial training stage our model has not learned well enough hence the output can be of anything.
- When we are in the initial training stage our model has not learned well enough hence the output can be of anything.
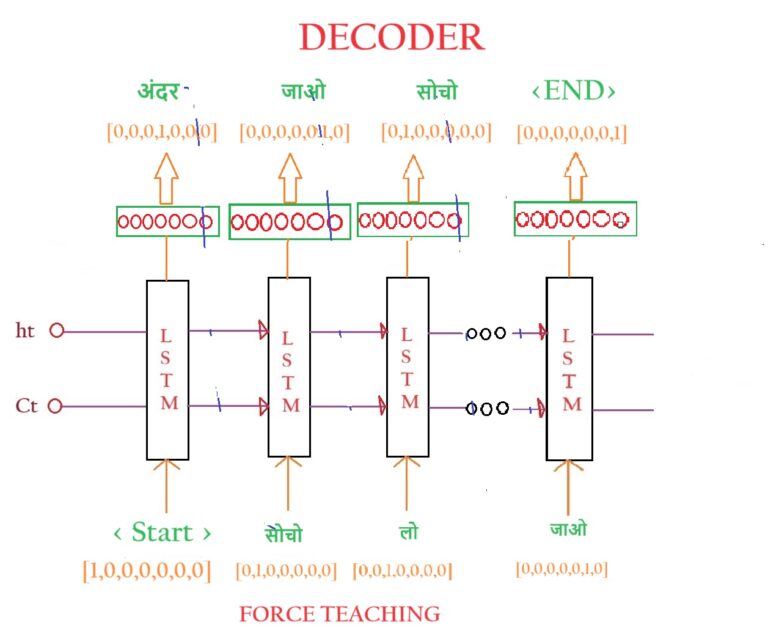
- In the above example, you can see that at time step 1, our model is giving ‘अंदर’ as the wrong output.
- But as per the logic, we should pass ‘अंदर’ to the next time step but, while training we need to pass the correct input values.
- In our case, we have passed “सोचो” as an input to the 2nd time step.
- This is called ‘TEACHER FORCING’.
- We can pass ‘अंदर’ to the second time step but the training will be slower if we pass incorrect input to the LSTM, hence we train the model with the correct input value.
- Like this, we will train our model for all the time steps with correct input values.
- We will stop training the model when the LSTM module gives <END> as an output.
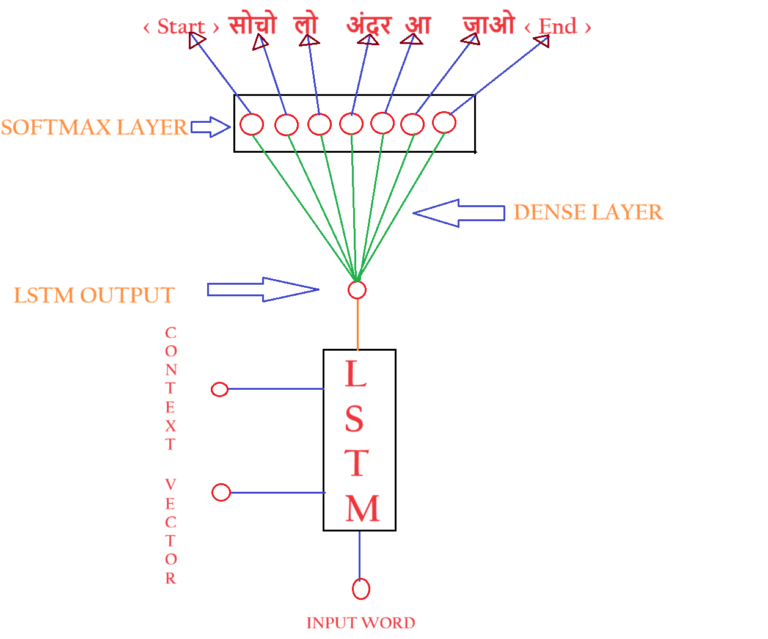
- The above picture shows the expanded picture of the one LSTM unit inside the Decoder layer.
- First, the LSTM layer will produce one output like ‘सोचो’.
- Second, It will be passed through a dense neural network layer with different weights attached to it.
- Third, the dense neural network layer will be connected to the Soft Max layer with an ‘n’ number of nodes.
- The number of nodes inside the softmax layer will be the number of vocabulary in the Hindi language.
- In our example, we have 7 words to train within the Hindi language. Hence it has 7 nodes inside the Softmax Layer.
- Each node in the Softmax Layer will represent the probability of each word in the vocabulary.

- The output from the SoftMax layer will represent the Probability value for each word.
- The word with the maximum probability will be chosen as the output.
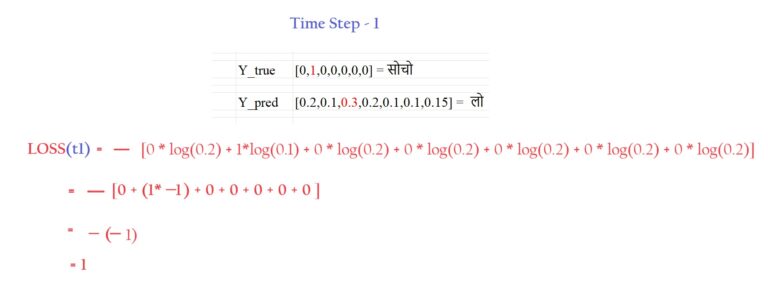
- In the above diagram, we got the probability of 0.3 for the word ‘ लो ‘, hence it will be the output for time stamp 1.
- But the output should be, ‘सोचो’, our model has predicted incorrectly as ‘ लो ‘.
- Y_Actual = ‘सोचो’ = [0, 1, 0, 0, 0, 0, 0]
- Y_Pred = ‘लो’ = [0.2, 0.1, 0.3, 0.2, 0.1,0.1,0.15]
Step-4: Calculate The Loss
- In the above step we have done the Forward Propagation to train the model.
- Our model has given some random output at initial stage.
- Now the next step is to calculate the Loss/Error our model has made while prediction.
- In our example we want to pick one word out of 7 words, hence it is like a Multi Class Classification problem.
- Hence the loss function that we would use will be the Categorical Cross Entropy loss.
- The formula for Categorical Cross Entropy loss function will be as below,

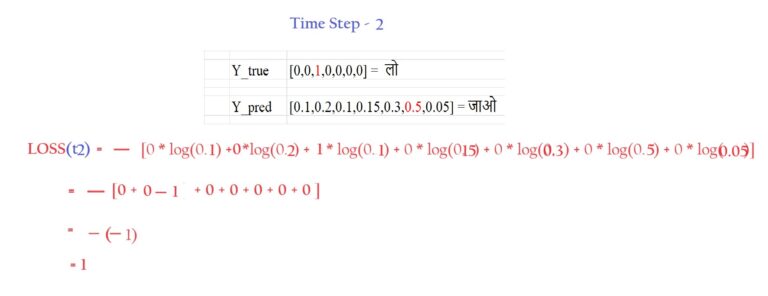
- Let’s take 3 time steps and calculate the error made in each time step.

- Here you can see that for the first time step, our output should be ‘ सोचो ‘ but we got ‘ लो ‘.
- For the second time step, our output should be ‘ लो ‘ but we got ‘ जाओ ‘.
- For the third time step, our predicted output <End> matches with the actual output <End>.
- Let’s calculate the loss for each time step as per the formula.


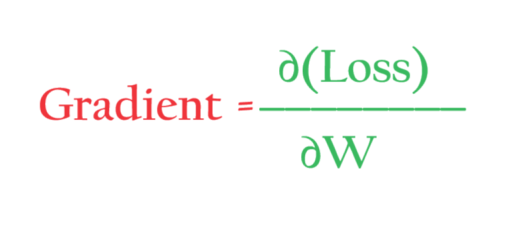
Step-5: Backpropagation To Minimize The Loss.
- The backpropagation step is essential in every deep-learning step used to minimize the loss.
- Backpropagation is done in 2 different steps.
- Calculating The Gradient.
- Updation Of Weights.
Calculation Of Gradient:
- We calculate the gradient of the loss with each of the trainable parameters.
- The parameters are LSTM, Dense Layer, Softmax, etc.
- We will calculate the derivative with respect to all of these parameters and see which parameter affects more to minimize the loss.
- Gradients measure, how much a parameter contributes towards loss and in which direction we need to adjust the parameter to minimize the loss.
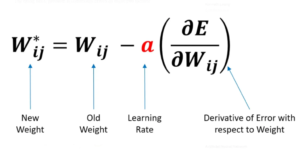
Updation Of Weights
- You have to update weights based on Gradients calculated w.r.t that weight.
- To do this operation we use Stochastic Gradient Descent, Adam, RMS Prop etc.
- The work of the optimizer is to adjust weights in that direction where loss will be minimized.
- We need to adjust the parameter based on a learning rate, which will determine the speed of the weight updation.
Note:
- Once we got the new weights after back propagation, we will take a new training example and train the model and calculate the loss.
- Again we will use the back propagation to minimize the loss by updating the weights.
(8) Model Prediction
- Now our model has fully trained which means the weights and biases are in there correct position.
- Now we will use this model to do the prediction for the new data.
- Let us use the train model to predict English to Hindi sentences.
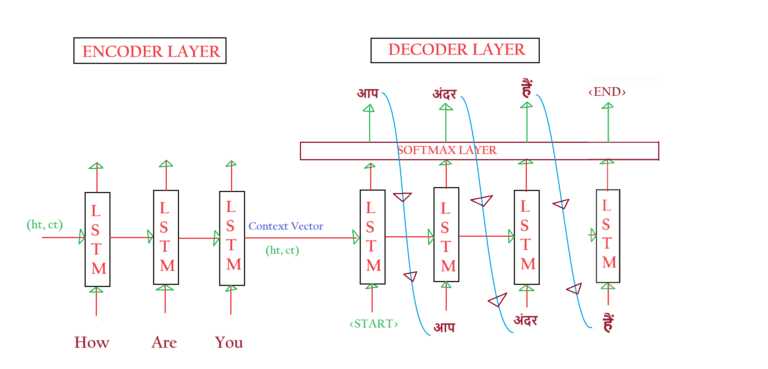
- Let us feed ‘How Are You’ to the model and see what it gives as an output.
- Step-1: We will tokenize the sentence [How, Are, You].
- Step-2: We will pass individual tokens to the Encoder layer in different time steps.
- Step-3: After you finish passing all the tokens at the end it will produce a context vector.
- Step-4: You will pass this Context Vector as an input to the Decoder layer.
- Step-5: At time step 1 we will pass ‘Context Vector’ and <START> as an input. Our model produces “आप” as a correct output
- Step-6: At time step 2 we will pass “आप” as an input to the LSTM layer it produces “अंदर” as an incorrect output.
- Step-7: At time step 3 we will pass “अंदर” as an input to the LSTM layer it produces “हैं” as an incorrect output.
- Step-8: At time step 4 we will pass “हैं” as an input to the LSTM layer it produces “<END>” as a correct output.

- Here you can see that our model has produced incorrect output.
- It depends on the training and how you have trained your model.
- You can use some improvement techniques to improve the performance of the model.